31 March 2010

Tartastic

I came across this recipe when looking for inspiration on what to make for dinner tonight (as established in previous post, I've decided on chicken tikka masala).  It's in a book called 'simplylite food' - chocolate mousse tart. 

This one has got to be dedicated to Vinnes, who snuck out of our hotel with me, at midnight, while on a school french trip to Noumea at aged 15, in order to hunt down and flush out some chocolate mousse before returning to NZ.  Good on you, tartlette! 

This tart is perfect for everyone - if you like chocolate, well hello - it's chocolate pastry filled with chocolate mousse.  If you prefer something more savory, just savour a small slice.  And because it's kept chilled, you can easily make it in advance, so it's ready when needed after dinner, no returning to the stove required.  Try it out and let me know what you think - I'm sure it'll work for you. 

Before we begin, just a quick note on blind baking pastry. It sounds a trifle daunting, particularly if you haven't a clue what it means.  It's very simple, just follow theses instructions - once the pastry has been laid into the tin/dish to be used for cooking cut a sheet of baking paper qbout 5cm bigger than tin.  Cover pastry with paper, fill with dried beans or rice, place on oven tray.  Bake in moderate oven (c. 180 degrees celcius) for 20 minutes.  Remove paper and beans, bake for further 10 minutes.  Cool. 
Pastry
110 g plain flour
1 tbsp cocoa
2 tbsp caster sugar
60 g butter (or half butter, half margarine)
1 egg yolk

Chocolate Mousse
2 tsp powdered gelatine
1 tbsp boiling water
35g dark chocolate, melted
2 tsp cocoa, sifted
1 tbsp Tia Maria (or similar, optional)
1/2 cup plain yoghurt
2 egg whites
2 tbsp caster sugar
  1. Grease 20cm loose-bottomed flan tin (if you don't have a loose-bottomed one, I know I don't, just line with some paper, or grease well and be prepared to have to carefully remove the first slice when serving). Turn oven on to 180 degrees celcius.
  2. Sift cocoa, flour and sugar into large bowl, rub in butter until resembles coarse breadcrumbs. Add egg yolk and stir until soft dough forms. Wrap in clingfilm and chill for 30 minutes, or until firm. Roll out between two pieces baking paper, place in tin and trim excess. Prick base with a fork and bake blind (see above).
  3. Now for the mousse...  Add gelatine to the boiling water, stir until dissolved.  Combine with melted chocolate (have this ready), cocoa, Tia Maria and yoghurt in large bowl. 
  4. Beat egg whites with electric mixer until soft peaks form.  Gradually add caster sugar, beating until dissolved between each addition. 
  5. Gently fold egg mixture into chocolate mixture, until well combined.  Pour into prepared and cooled pastry case, refridgerate for one hour, or until set.  Slice and serve.
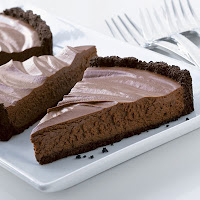
I learnt, whilst making this earlier, that it's best to get the pastry completely sorted and cooled, before starting the mousse, as the mousse is ready relatively quickly.  For the mousse, have the chocolate melted, and sitting waiting (in small bowl, placed in warm water, to keep it liquid but without burning). 

Mughal v Weegie

The debate rages as to whether the beloved chicken tikka masala originated in the pre-colonisation Mughal Empire, or in Ahmed Aslam Ali's kitchen in Glasgow.  To be honest, I don't care.  I just want to eat it.  It's easily my second favourite indian curry dish (first place is bagged by saag gosht, a tasty lamb-spinach confection of delight).  So, whether the origins lie on the subcontinent, or in Scotland's largest city, tonight it's being cooked in Hamilton. 

As an aside, a quick lesson in linguistics - tikka refers to the fact that the meat is grilled prior to being added to the curry sauce.  Masala simply means mixed spices, so don't worry if a masala recipe calls for neither 'garam masala' nor 'masala wine'.  You enjoy the wine!! 

Marinade
1 cup plain yoghurt
1 tbsp lemon juice
2 tsp ground cumin
1 tsp ground cinnamon
2 tsp cayenne pepper
2 tsp freshly ground black pepper
1 tbsp minced fresh ginger
salt, to taste (up to about 4 tsp)
3 boneless, skinless chicken breasts, cut into bite-sized pieces
4 long skewers (ease of grilling)
Sauce
1 tbsp butter
1 clove garlic, minced
1 jalapeno pepper, finely chopped
2 tsp ground cumin
2 tsp paprika
salt, to taste (up to about 1 tbsp)
1 tin tomatoes / tomato sauce
1 cup coconut milk or cream
1/4 cup fresh coriander, chopped (garnish)
cooked rice, to serve
  1. Combine all marinade ingreadients, stir through chicken, cover and chill for an hour. 
  2. Preheat grill.  Thread chicken onto skewers, place on baking tray under grill and cook for about 5 minutes on each side (discard marinade).
  3. Melt butter in large, heavy pan over medium heat and saute jalapeno and garlic. 
  4. Add spices and salt, stir in tomatoes and coconut.  Simmer over low heat until sauce thickens (about 20 minutes). 
  5. Add the grilled chicken (remove from skewers) and simmer for further 10 minutes. 
  6. Serve on rice, sprinkled with fresh coriander. 
Nb: Coriander is also known as cilantro, for those hailing from North America.


29 March 2010

I want to be an Austrian

Dancing around on the beach (in Wellington) over the weekend it was decided that I ought to film my prancing, send it to the Austrian authorities and demand automatic citizenship.  I guess I must have been doing a half-decent approximation of a schuhplattler (well, a female version of it).  As a token of respect to my new-found mothercountry, I thought I'd share a recipe which I love, along with the majority of Austrians (unless they've lost their tastebuds).  It was first given to me when I lived in France in 2002, by an Austrian guy who lived in my foyer (hostel-type apartments, not in my entrance hall), and subsequently a variation on the original recipe was given to me by Isi, a lovely German girl who plays handball here in kiwiland.  So, for all Austrians, both actual and honorary, kaiserschmarrn...  

Kaiserschmarrn literally means Emperor Mishmash, it's a messy looking dessert that is basically scrambled pancakes, or pancakes cut up post-cooking and made to look vaguely scrambled.  Yum - pancakes that aren't ruined if they don't look perfect!!  I've given first the standard recipe, followed by Isi's variation.  Enjoy!!

3 eggs, separated
100g flour
2 tsp sugar
1/2 tsp vanilla extract
1/2 tsp salt
1/4 cup milk
100g butter
handful raisins (optional
icing sugar
  1. Mix egg yolks, flour, sugar, vanilla, salt and milk into a thin dough.
  2. Whisk egg whites until stiff, mix through dough.
  3. Melt butter in pan and add dough.  Sprinkle with raisins, if using, and fry it over a low heat.
  4. Turn pancake over.  Tear into little pieces and fry through (alternatively you can leave in one piece to cook, then cut into strips after removing from pan). 
  5. Serve sprinkled with icing sugar.  Traditionally it would be served alongside some fruit compote - apple or plum work well. 
Isi's Fusionschmarrn

3 eggs, separated
2 tbsp sugar (sugar high!!!!)
60g flour
200g sour cream
butter (for frying)
icing sugar
milk (only needed if mixture if too stodgy)
  1. Make in exactly the same way as above - just add a little milk, if too thick. 
It looks like a mess, but it tastes amazing.  Nom nom nom.  Vielen Dank Österreich!!!!

24 March 2010

Tongariro Chocolate Crossing

Stine and I are going to do the Tongariro Crossing on Friday, before heading to Wellington with Sandy for handball training.  I think it's a good idea, if possible, to squeeze a little home baking into the ol' daypack, when doing any kind of hiking, be it a day walk like the Crossing, or something a bit more lengthy, such as the Heaphy or Waikeremoana.  I mean, when you've been slogging your guts out up something like the Devil's Staircase you deserve to have some treat to look forward to.  At times like that a barley sugar just ain't enough.  So, time to get something baked, to take with...

Mum was given this recipe, and she passed it to me, for a chocolate brownie that is cooked in the microwave, ready in 6 minutes.  I kid you not.  I'm rather sceptical of microwave cooking, and it's just not as fun - no stirring - but it is bloody useful when you've got to be out the door in 20 minutes (or if someone stops in for a cup of tea, or after dinner and you have a hankering for a little bit of something sweet...).  So, if you're like me then put your microwave-prejudice to the side, and give this one a go.  It's foolproof, yum and makes enough for a few people.  Sweet!! 

100g butter
1 cup sugar
1 tsp vanilla essence
2 eggs
¾ cup choc chips
1 cup flour
2 tsp baking powder
2 tbsp cocoa
  1. Melt butter in microwave. 
  2. Add sugar, vanilla and eggs and mix together.
  3. Add remaining ingredients, mix.
  4. Pour into microwave-safe dish and cook on high for 5-6 minutes. 
Once cooled, slice and serve!  Try serving with some whipped cream, yoghurt, or just dusted with icing sugar.  :) 

22 March 2010

Food heaven

I go away a lot on weekends.  It's not that I don't like staying at home - I love home, home is awesome.  But a number of friends live elsewhere around the country, I have a car and so...  Add to a general inclination to go visiting the fact that I play handball and, from necessity, travel frequently to other centres for training or tournaments, and you have a fairly busy itinerary.  


One thing I love about travelling is also one of the things I dislike - being away from my kitchen.  It means I either can not, or do not need to, cook.  However, as every cloud has a platinum lining (I refuse to settle for silver, so tawdry), this also means one gets the chance to eat out and/or sample the culinary delights of others.  This weekend I've been staying in Auckland with cousins.  Dona and Gav run Northport Events, an Events Management company who's children include The Parent and Child Show and, dum dum dum... The Food Show.   Not surprisingly they are both great cooks who's kitchen is always stocked with tasty, fresh and good quality fare.  Dona makes mean mexican food too (being herself a Southern Californian), which makes me verrrrry happy.  


Over my weekend away I ate dinner with some ex-high school friends, at Ponsonby Thai restaurant Sawadee (there's also a Thai in Ponsonby called 'Thai Me Up', which I think is a fantastic name!!), brunch at the Richmond Rd Café and tasty soft shell tacos a casa.   I shall do my best to guide you on how my fav dishes were made, though if you're in Auckland, seek these places out (except maybe not Dona and Gav's, as randomly turning up in strangers' living rooms is considered highly unusual, if not illegal, by most people).  


Green thai coconut prawn - Sawadee


1 tbsp vegetable oil
1 onion, diced finely
sticks of carrot (size of a hot potato chip, roughly)
bamboo shoots, cut to size of an udon noodle
assorted vegetables - cauliflower and broccoli are good
1 tbsp green curry paste
1 tin coconut milk
500g prawns - deveined, but with tails still on
fresh coriander, chopped
rice


  1. Heat oil and cook onion until soft.  Add other vegetable to pan, reduce heat and stir in curry paste.  
  2. Add coconut milk, stir to mix well with curry paste, allow to simmer on low heat.  If the taste is not strong enough you can add more curry paste, but beware of adding too much as they tend to be rather salty.  Sometimes a mixture of yellow and green pastes is a good idea.  
  3. Cook rice.
  4. When rice is ready, add prawns to curry, along with fresh coriander.  They'll cook really quickly, so when pink remove from heat and serve with fluffy rice. 

Buttermilk pancakes served with blueberries and mascarpone - Richmond Rd


2 large eggs
1/4 cup vegetable oil or melted butter
1 tsp lemon zest (optional)
1 cup buttermilk (use half/half skim milk and plain yoghurt, if you've no buttermilk in the fridge, which let's be honest, the vast majority of us don't)
3 tbsp brown sugar
2 tsp baking powder
1/2 tsp baking soda
1/2 tsp salt
1 and 1/2 cups flour
1 cup blueberries
dollop mascarpone cheese, one per person
  1. Mix all ingredients together, except berries and cheese, in food processor (or in bowl with elbow grease).  Allow to sit for 30 minutes.
  2. Spoon ladlefuls into hot pan (greased with a tiny bit of butter).  Flip when bubbles form and cook other side.  Remove from pan and repeat until all batter is used up.
  3. Serve with berries and cheese.  Soooooo yum!  You can also serve with maple syrup, bacon etc, it's up to you, really.   
Mexican fiesta 


The cool thing about having meals such as tortillas, tacos, fajitas and so on is that you just put out several bowls, each filled with different requisite foods, and let people DIY their own combinations.  No fiddly serving for the cook and no diner has to eat anything they don't like or can't eat.  If you land the following dishes on your table, you're guaranteed to have smiles beaming back at you - mexican, small corn tortillas (Dona uses, and I would heartily recommend, Tio Pablo - they're really soft and taste great), guacamole, brown rice, salsa (we had La Morena salsa rojo - muy autentico, grated cheese, salad, sour cream.  


The guacamole was similar to that in an earlier posting (Avocado + Argentina = muy gustoso), except instead of mushing the avocado with balsamic, use freshly squeezed lemon juice.  About one lemon per avocado.  It makes for a slightly less sweet guac, which with all the other flavours is better.    


For the vegetarian beans it's really a matter of taste, trial and error.  I wasn't watching like a hawk when this was being created, but fortunately my cousin Gina (Dona's daughter) has paid more attention and blogged about this before.  You need 


2 tbsp olive oil
1 leek
2 carrots
1 red onion
1 chilli (choose one that has enough pep for you, but not too much - there's nought worse than not being able to eat your own cooking)
2 tins pinto beans
1 tin black beans
1 tin tomatoes
mexican seasoning (Tio Pablo is good again!!)
coriander
  1. Sauté leek, carrots, onion and chilli until softened.  
  2. Add other ingredients and simmer until you're ready to eat (ideally leave it simmering away for a good half-hour or so, to allow the flavours to settle in).  
If you've got some corn on the cob, cut the kernels free and chuck them in too - yum yum yum!!  Or as I ought to say, muy gustoso.  


19 March 2010

Peanut chicken soup for the soul

This is a recipe Mutti sent me earlier this year, having been given it from Sharon, a lovely lady she has met since moving to Texas.  At first glance I was a bit dubious - peanut butter?  But she assured me that it was amazing.  So last night I threw my (as it turned out, misguided) preconceptions to the wind and cooked up a pot of this tasty tasty soup.  


The soup started off relatively clear and broth like, but with the addition of the peanut butter became wonderfully creamy.  I can't wait to make it again.  It would be ideal also if you're vegetarian, or have vegetarian friends coming for dinner, as one could easily leave out the chicken, and throw in an extra couple of kumara.  Bada bing, bada boom.  


So thanks, Mum, your soup recipe is AWESOME!!  Watch this space for her crunchy chicken casserole, coming to a kitchen near you soon!  xx A 


Heart-warming, taste-tingling, soulful soup from Mutti


2 tbsp olive oil
2 onions, chopped
1 capsicum, chopped
4 cloves garlic, crushed
3 chicken breasts, cut into bite-size pieces
several fresh tomatoes, quartered (or 1 tin)
1 jar tomato salsa
2 L (8 cups) stock (I use half vegetable, half chicken)
1 tsp cumin
1/4 tsp chilli flakes or powder
few good grinds black pepper
2 kumara, chopped
1 tin black beans
1/2 cup brown rice
2/3 cup crunchy peanut butter 

  1. Heat oil in large stock pot, gently fry the onions and capsicum until lightly coloured.  Add garlic.   
  2. Add everything from chicken to black beans, bring to the boil, then turn to lower heat and simmer for 30 minutes.
  3. Add rice and peanut butter, simmer for further 30 minutes.
  4. Serve hot either as is, or with fresh crusty bread or toast.  It'll easily serve 8 people. 
Sooooo tasty - just make sure you let people add their own salt.  No salt whatsoever needs to be added during cooking, as generally stock is already very salty.  If you're using fresh stock, you may need to add a little salt, but err on the side of caution.  

PS: The photo has nothing to do with cooking, whatsoever.  I just found it amongst my folders and remembered how fun disc golf is.  


17 March 2010

Rí rá agus ruile buile!!

March 17th, Happy Saint Patrick's Day friends!!  It seems appropriate that I take the opportunity to delve into my recipes and pull out something with potatoes in it.  I tried to think of something green, but potatoes are just so yum. 

For six Paddy's Days in a row I worked in Kitty's, so feel a fairly strong personal affinity with the day.  There's something magical about it - unfettered fun, everyone having a few bevies and mingling in the bars and in the streets.  Kind of like a small-scale version of mardi gras in New Orleans, perhaps? 

Susan, a friend and ex-Kitty's lass like myself, was pleased to see a favourite from their menu gracing the blog.  So in honour of you Sus, and the day, here's another one...

Irish Stew, Kitty's Style
500 g lamb (I use whatever’s cheapest) (boned, fat removed)
2 parsnips
3 carrots
3 potatoes
2 kumara
2-3 onions, diced
2 cups water
2 cups stock (beef is good)
salt and pepper
  1. Peel and cut into chunks all the root vegetables.
  2. If there are bones in the lamb I prefer to remove them (I can’t be bothered with bones when I’m trying to eat something like a stew).  If that’s also your preference, cut the meat from the bone now.  Also remove excess fat. 
  3. Layer meat and veges in a deep pot, seasoning with salt and pepper as you go.
  4. Pour over the water and stock, cover with lid.
  5. Simmer gently for 1 ½ hours on stovetop.
This is best served with hot, buttered toast, or fresh bread.  Will serve 6-8 people.  YUM!!

One more, seeing as it's a holiday post.  ;) 

Potato Pikelets

This is from the Old Library Café in Fairlie.  Ireland meets kiwi, the humble potato and the humble pikelet, in a gastronomic marriage that comforts even the weariest tastebud.  Perfect with something like bacon, or with the above stew... 
500 g potatoes, cooked and coarsely mashed
2 eggs, separated
150 g flour
1/4 tsp baking powder
salt and pepper
  1. Mix everything together, except the egg whites.
  2. Beat egg whites, fold into the mixture.
  3. Fry in rounds, until cooked on both sides. 

15 March 2010

I'm a Crunchie Train Robber

The year is 1975.  New Zealand is about to witness what was to become one of the most memorable, and enduring, television advertisements ever to grace the Aotearoa airwaves.  The Crunchie Train Robbery, made to advertise Cadbury's ever-popular Crunchie bar, took NZ by storm.  I don't think there are many kiwis who haven't seen it and, thanks to the wonders of the internet, it's likely that future generations will be able to have a complete cultural education too.  

Crunchie bars are definitely a kiwi favourite.  It's our beloved hokey pokey, wrapped in cadbury's signature milk choc (personally I prefer dark chocolate, but even I'm rather fond of the ol' Crunchie).  You can eat it straight, you can carefully bite the chocolate off the sides to expose the golden hokey pokey within, you can chomp one end off and proceed to suck the hokey pokey out, bit by bit.  Kind of like creme eggs and mallowpuffs - every one has their own preferred method of inhalation.   

For years I've been making hokey pokey biscuits (since I was about 8 and decided to be nice to my brother, for once, and make something which he could take back to boarding school with him).  I've used numerous recipes, most of them fairly similar.  Today I came across one from Alexa Johnston, of yesterday's blog post fame.  She suggested (at the behest of her sister) that one might add chocolate chips to the otherwise humble HP cookie.  BRILLIANT!!  In one swift movement the hokey pokey biscuits have become Crunchie cookies.  And they're amazing.  I've made them to take to handball training tonight, but there are already two less that went in the oven... 

115 g butter (4 oz)
115 g sugar (4 oz)
1 tbsp milk
1 tbsp golden syrup (it was 2 tsp, but what can I say, I like golden syrup)
1 tsp baking soda
1/2 tsp vanilla essence
170 g flour (1 large cup)
3/4 cup chocolate chips
  1. Preheat the oven to 350°F/180°C. Line two baking trays with baking paper or grease them lightly.
  2. Cream the butter and sugar until soft and light.
  3. Put the milk and golden syrup in a small saucepan and bring to the boil over a medium heat. The mixture will curdle, but don’t worry. Add the baking soda and stir quickly with a wooden spoon until it froths up. Pour it onto the butter and sugar and mix well.
  4. Add the vanilla followed by the flour and chocolate chips.
  5. Place teaspoonfuls on the trays and flatten slightly with a fork. Bake for 10–15 minutes until golden brown. Cool on a rack. Makes about 24 tasty tasty biscuits. 
And remember -

"Life’s a whole long journey, boy, before you grow too old,
don’t miss the opportunity to strike a little gold.
Out West the folks are crossing you,
the way to make them stop, is to quick draw your Crunchie bar…
and fill 'em full of choc.
Have a Crunchie, hokey pokey bar, Golden Crunchie, hokey pokey bar."

14 March 2010

Cake, or death?!

We had a handball tournament over the weekend, in Taupo.  The usual timetable was adhered to - meet, games, debrief, shower, prizegiving at local pub.  It's a time-proven and-honoured traditional order of ceremony and not one we'll be messing with any time soon.  This tournament had a slight variation however - it was one of the guy's birthday!  Pat turned 22, so prizegiving was also birthday shindig, ensuring extra merriment abounded all 'round.  In keeping with the festive atmosphere I had promised to bring a cake, so the birthday lad had some candles to blow out, to commerate the occasion in front of the North Island handball fraternity.  I'm not a massive chocolate cake fan, in general, but this one is yum.  It's from a wonderful book of kiwi baking recipes called 'Ladies, A Plate'.  I think the reason this one resonates so well with me is that it smells good too, 'cause of the raspberry.  It's easy to make, and so worth it for birthdays and other special occasions.  Every one should have a cake for their birthday!! 

Nb: If you're not a fan of raspberry, try using peppermint essence, and replace rum with pepperminty schnapps or something. 

CAKE:
115g butter
200g caster sugar
1 egg
1 tsp baking soda
3 tbsp rum (optional)
180 ml milk (or 225ml, if not using rum)
180g flour
2 tsp baking powder
4 heaped tbsp cocoa
1 tbsp golden syrup (optional, but makes a mightily moreish cake!!)

ICING:
115g butter
180g icing sugar
2 tbsp cocoa
2 tbsp milk
1/2 tsp raspberry essence (or peppermint, if you prefer)
  1. Soften the butter and take the egg out of the fridge. Grease a 18 cm square tin with butter, and line the base with baking paper. Preheat the oven to 190°C.
  2. Using a cake mixer (I used a hand-held one and that worked fine), cream the butter and sugar until light and fluffy and beat in the egg.
  3. Dissolve the baking soda in the milk.  Have all the dry ingredients ready together in a bowl.   
  4. Fold in dry ingredients in about three lots, alternating with the soda and milk. It will be quite a soft batter. Cook for about an hour (my oven's fan-forced and it only took 30 mins) - the cake will shrink slightly away from the sides of the tin and when you press the centre gently with your finger, it will spring back.
  5. Remove from the oven, and cool on a rack.  Ice when completely cooled. 
  6. For the icing, soften the butter, and cream it with the sifted icing sugar and cocoa, then add enough milk to make a soft, spreadable consistency. Add the raspberry essence.
  7. If the cake is quite deep, you can cut it in two (top layer/bottom layer) and spread jam between the layers.  Mine tend to be fairly shallow, so I just ice the top, then decorate as the mood or occasion dictate.  :) 
If you want to check out an hilarious piece of standup comedy, and the inspiration behind today's title, go to YouTube, Eddie Izzard

11 March 2010

Rose rocks Masterchef NZ

My friend Rosie works for TVNZ.  A recent team-building exercise took them to the Masterchef NZ soundstage (do they call it that, in TV?), to participate in the Mystery Box Challenge.  Basically they're each given a box containing mystery ingredients and... you gotta cook 'em.  And you gotta cook 'em well, 'cause Simon Gault (uber-tough MNZ judge, he's sort of the food challenge equivilant of Simon Cowell) was there, watching like the proverbial hawk. 

Rose got duck.  DUCK.  Do you know how hard that is to cook?  Well, how hard it is to cook and make it tasty and not dry?  Tough.  But Rose rose to the occasion (sorry, couldn't help myself) and created an asian-inspired gastronomic saladial-feast! 

Asian duck salad

Duck, enough for 4 people
Cabbage, sliced finely (red or savoy is nice)
2 oranges, segmented (and chopped, if too large)
1 cup mint
red onion, chopped
ginger
oil, for deep frying

Rose started by poaching the duck and then shredded it.  This was placed upon a bed of asian salad made with cabbage, orange, mint and red onion. The taste sensation was completed by a sprinkling of crispy deep fried ginger.  Simon said he would be happy to eat Rose's salad, and that's good enough for a nellamiacucina shout-out, in my books!!  Kudos Rose! 

10 March 2010

Frittata this!!

Tonight was my turn for cook for the whanau.  Given the extreme abundance of tomatoes on the vines outside, frittata seemed like a good idea.  Frittatas are awesome, 'cause you can literally throw anything into them.  Also good if you have a fair few eggs to use up.  This one was cheesy, tomatoy and YUM!  Needs to be served with a salad though, to balance the cheese...  I always feel a bit lazy, making frittata, but as with an omelette it's one of those simple meals that are actually really tasty and always well-received. 

1 cup cooked pasta (leftover from night before is ideal)
4 tomatoes, chopped
good handful basil leaves, torn up
clove garlic, chopped fine or crushed
2 tbsp extra virgin olive oil
1 tsp lemon juice
6 eggs
1/4 cup milk
1/4 cup parmesan cheese, grated
salt & pepper
2 tbsp butter
1/4 cup chedder cheese, grated
extra parmesan, grated

  1. Mix pasta, tomatoes, basil, garlic, oil and lemon juice in large bowl.  Add eggs, milk, first lot of parmesan, salt and pepper. 

  2. Heat butter in large pan (needs to be one that can go under the grill, so avoid ones with plastic handles).  When piping hot, add eggy-tomatoy mixture.  Cook for about 8 minutes, lifting edges from time to time, to allow uncooked egg to slip underneath. 

  3. Sprinkle chedder and extra parmesan on top, place under hot grill for about 5 minutes, or until golden and puffy. 

  4. Remove and allow to stand for 5 minutes.  Serve with a salad and perhaps a little relish.
This is so adaptable - replace tomato with some chicken, mushroom and bacon, for a completely different flavour.  Or stir through some pesto.  Zucchini, kumara (cooked and cubed), pumpkin (also cooked), chilli, olives... You get the point.  ;) 

09 March 2010

Chicken one day, feathers the next

Most of you will know that I worked for several years at that venerable Wellington establishment, Kitty O'Sheas.  Over the years I sampled many drinks, alongside many foods.  For several years Gary Povey was the chef in the Kitty's kitchen and he made what was, hands down, my favourite Kitty's meal (and there were a few - the burgers were, and still are fantastic, the lasagne, the warm salads, yum yum yum, and let's not even get started on tasty things like fries).  Anyway, I digress.  Favourite food at Kitty's - what I like to call Chicken breast à la Kitty's.  Not very fancy sounding, but who cares?  It's easy to make and really good.  Perfect if you've someone coming for dinner and want to cook something smart and good, but without fuss. 

Chicken breasts (one per person)

Cream (half a cup or so, for two people)
White wine (a good slosh, I'd go with a half cup or so)
Salt & pepper
Pinch of cornflour (whisked into a little warm water)
Herbs
Potatoes, for mashing
Knob butter, maybe a little milk
  1. Get potatoes going, so they're ready to mash once chicken and sauce are sorted. 
  2. Cook chicken in pan, turning once or twice, until cooked through.
  3. Remove chicken to plate, cover. 
  4. To make sauce, use wine to deglaze pan. Add cream, reduce.  How much wine and cream you use really depends on how much sauce you want.  It's pretty rich, so not too much is needed. 
  5. Add cornflour/water. Important here that cornflour has been whisked into warm or hot water, so there aren't lumps of it.  This will serve to thicken the sauce. 
  6. Serve over the chicken on bed of mash.  Have some green vegetables, or a salad, on the saide. 
Soooooooooooooooooooo good.   PS:  Also good with rice.  Nom nom nom. 

And here's a little bonus recipe - this is from Hazel, a family friend in Odessa, TX.  Southern chicken, baby!!

Flour, seasoned with salt, pepper and herbs/spices (I like Cajun, or Moroccan)
Milk
Chicken pieces (drumsticks, whatever)
  1. Roll chicken in seasoned flour.
  2. Dip in milk.
  3. Dredge through flour again until well coated.
  4. Fry in a very hot pan, or BBQ.

05 March 2010

I ♥ pizza

Given the title of this post, it really need not be said that I love pizza.  But because I REALLY, truly adore it, I think it's worth belabouring the point.  Pizza is my favourite food.  I mean, sure, there are other meals I've eaten that are fancier, more exciting, maybe even nicer than pizza (see 'Please pass the goat!'), but pizza is the food that I always love.  I'm always in the mood for pizza.  Even average pizzas are pretty good.  Which means good pizza is AMAZING.  It's the food equivilant of 'Love Her Madly' by The Doors.  It's the one I'll always come back to, no matter what other things pass over the radar. 

Pizza bases can be found in any supermarket, and range from absolute shite (please excuse my language, but I feel very strongly about the cardboardy 'pizza' bases some companies subject us to) to passable-if-you're-exceptionally-low-on-time.  The bases from the bakery section of Countdown are, in fact, the only pre-made ones I've ever used which I would personally consider good enough to use.  Anyhoo, my point is (amazingly I do have one) that making your own bases is best.  I know that sometimes there's just not the time, but if you've an hour and a half before you need to eat, then do it.  It's not like bread, where the dough needs to rise twice.  Pizza dough only sits/rises once, which cuts the prep time considerably.  So here it is...

Pizza pizza pizza (alla Allyson Gofton, with some personal amendments)

1 and 1/2 cups warm water
2 tsp yeast
1/2 tsp sugar
500g flour
1 tsp salt
3 tbsp olive oil
  1. Put the water in large bowl and sprinkle with yeast and sugar.  Stir to mix well and set aside for about 7 minutes, until yeast has dissolved and becomes soft and spongey on top of water. 
  2. Put flour and salt into food processor.  With motor running pour in olive oil (If you're not using a processor, use large bowl, slowly pouring in oil and mixing well).
  3. With motor of processor running pour yeast mixture fiwn the feed tube as fast as flour can absorb it (if doing by hand you'll need to pour/mix slowly, until all combined and pulling away from edges in a ball).
  4. As dough forms a mass allow the processor to keep going for a minute, until formed into a ball.  Transfer to lightly oiled bowl, cover with clingfilm and set aside (somewhere warm, like an airing cupboard) for 45 minutes, until doubled in bulk.   
  5. Preheat oven to 220 degrees celcius.  Turn dough onto floured board, divide in two, press out into circular pizzaesque shapes, on pizza stone or floured tray.  Top (do this fairly promptly, as you don't want the dough rising while you're off doing something else). 
  6. Brush edges with oil, bake for about 10 minutes, of until golden and tasty-looking.  Buonissima!! 
Toppings...

I really like simple pizzas, topped with tomato, basil and mozzerella (thank you, Queen Margherite of Naples).  Sauteed onions with a little garlic and parmasan cheese is also really nice, and light (good to cut into small pieces and serve as hot nibbles at a party).  Tonight however I'm going a little crazy.  Pizza pazzissima (crazy crazy pizza!!).  I'm going to try something that is just sooooo wrong, but will taste really good.  Wrong, but good.  For this, I apologise to pizza puritans the world over. 

Butter Chicken Pizza

2 pizza bases
1 cup hummus
1 tin butter chicken sauce
couple handfuls baby spinach leaves
1 chicken breast, very finely sliced
1 onion, finely sliced
1 cup grated cheese
100g feta
  1. Spread pizza bases with 1/2 cup each hummus. 
  2. Cook chicken and onion in pan (with a little oil), stir through butter chicken sauce.
  3. Spread chicken over pizzas, scatter with spinach and sprinkle with cheese and feta.
  4. Bake for 10-12 minutes. 
  

02 March 2010

Please pass the goat

Having spent the weekend in Wellington (and thus away from my beloved kitchen) I've been eating at a variety of establishments over the past few days.  Last night I went with Frank and Iva to Osteria del Toro, on the corner of Tory and Holland Streets.  I'd eaten there once before and enjoyed it, but had only eaten the tapas-y style foods.  Last night we branched out and shared a plate of slow-roasted capretto (young goat, lamb-aged I guess).  Served with roasted potatoes, whole bulbs of garlic and cipolline (wee onions) it was DIVINE!!  I honestly would never have thought goat would have me raving like this, but there you go.  All the way back to Hamilton today (an 8 hour bus trip) I found my mind slipping back to last night's feast.  Here's how one could recreate the gloriousness that was our capretto, if Wellington ain't in your pocket...

Leg of goat (or other roastable piece) - young
4 potatoes, chopped into small pieces
2 bulbs garlic (cut bottom off, but don't bother peeling)
onions, chopped up (or use small shallot-sized onions)
olive oil
large green olives
herbs of choice
salt and pepper
  1. Rub oil over meat.  Place on roasting tray.  Drizzle oil over garlic, potatoes and onions, in roasting tray too.  Salt, pepper and herb the lot.  Roast in oven at c. 100-120 degrees celcius for about 3 hours.  This may seem tedious, but slow-cooking it is worth it.  It'll be juicy and should fall off the bone easily at the end. 
  2. If it starts to cook too quickly on the outside, cover with some foil. 
  3. Serve with some olives.  Serves 2 hungry people.  :)