21 December 2011

Berry Christmas everyone!

Wow. Technology is wicked. Well, sometimes. I've just discovered that there is a blog app on my phone. Love it! I loved my nokia, but these smartypants phones...

Anyhoo, it's only 4 days til Christmas, so get out there, buy up some berries, and feel the relaxation start to kick in. Berries are great like that, maybe its the antioxidants?

Berry Christmas!!


20 December 2011

baa baa black sheep

It's been a long time since the last post.  Website kept crashing, so I thought it might be time to give it a wee holiday.  But all seems to be working again now, so here we go! 

It's been a busy few weeks since 02 November, the silly season's started and we're only a few days out from Christmas.  I'll not bore you with a detailed recitation of what's been cooking over the past 48 days, but will ease back into the world of bloggery with slightly more detailed rack of lamb details that was posted on Facebook

I'd never done a rack of lamb before, but I can tell you right now that I'll be doing it again, and very soon.  It was so tender and, if you shop around, pretty damn cheap.  It was $15/kg at the supy.  This will serve four peeps. 

2 x 7 chop lamb racks
2 tbsp harissa
6 tbsp breadcrumbs
2 tbsp olive oil
2 tbsp fresh parsley, chopped
2 tbsp fresh mint, chopped

  1. Smear the fat side of the lamb with harissa. 
  2. Mix breadcrumbs, oil and herbs in bowl.  Press mixture onto harissa-smeared lamb. 
  3. Roast in preheated oven (180-200 degrees) for 15 minutes. 
  4. Remove from oven and allow to rest for 5 minutes before serving. 
  5. Serve with new potatoes, asparagus and pan-fried zucchini, for the flavours of summer!
Nb: 15 minutes, our lamb was medium-rare after resting.  If you want yours less or more done, adjust the cooking time accordingly. 

02 November 2011

when the moon hits your eye, like a big pizza pie...

I've made pizza bases before. I've blogged about making pizza bases before. Heck, I've already blogged the exact recipe for this pizza base before. But this weekend, the pizza-making took on a whole new dimension, so much so that re-bloggery was imperative. The yeast was spongey like sea foam, the dough more than doubled in size and had the elastic quality that every pizza maker strives for.

As I said, this recipe ain't new, but for the first time in my pizza-making career, the dough just seemed to do absolutely everything it was supposed to. All the pizzas in the past have been wicked, but this one was sublime. Nir-freaking-vana my friends. I'd like to think it was me and my general awesomeness that made the difference, but I think it was more the pizza-making partnership with my sous chef KB (said rather tongue and cheek, given it was he who prepared the frothy yeasty goodness which forms the foundation of a winning dough).

From the moment I set eyes (in complete astonishment, I'd never seen yeast activate like this before) on the mixing bowl, I knew this was the dough for visual documentation. So, without further bleeting on, here follows a pictorial guide to pizza greatness. Thanks to both KB and Mac, the dog who tried to help, by licking up the excess flour.

1 and 1/2 cups warm water
7 g active dry yeast
1 tsp sugar (or thereabouts)
500 g flour
1 tsp salt
3 tbsp olive oil
extra olive oil, for brushing crusts
parmesan, for crusts (optional)
tomato paste / satay paste (or others, such as BBQ sauce etc)
toppings


The step-by-step method can be found at the link at the beginning of this entry. What follows is a pictorial of how the pizza-making process is done. Oh, and to get your frothy yeast into super-risen dough - pour the yeast mix into the flour/salt/oil in a food processor. Mix until it forms a ball and pulls away from the sides. Return to well-oiled bowl, cover with damp teatowel and place somewhere warm for 45 minutes. I preheat the oven a little, then turn it off. No drafts, works well. Buon appetito!!!


NB: It's a good idea to get the toppings all ready to go while the dough is rising. Once you've got your dough flattened into bases, you want to top them asap, 'cause otherwise the dough will start to rise again and you could end up with fluffy, thick pizzas, instead of thin, pizzary goodness. Enjoy!!

12 October 2011

me gusta mañana, me gustas tu, me gusta enchilada, me gustas tu - n◦ 2

I haven't really made a lot of enchiladas this year.  Plenty of burritos, a few batches of tasty tasty empandas, but not a lot on the baked goodness of the enchilada-front.  Time to get back on the horse.  Ordinarily I'm a chicken and kidney bean kind of girl, when it comes to enchiladas, but last night decided to make them with essentially a spag bol concoction.  Have mince, will travel. 

The thing I really love about enchiladas (and indeed the majority of tortilla-based foods) is that you can make the filling well before dinner time.  Heck, make it the day before.  Or a month before, then freeze it.  It doesn't matter, especcially for enchiladas, 'cause you're going to whack 'em in the oven anyway.  We had our mexican canneloni (it's what they remind me of) with a warm salad - cauli, red onion, garlic, ginger, beetroot, carrot and thinly-sliced kumara, stir-fried to perfection by KB with sesame oil. 

For 6 enchiladas (so 3-4 people, or 2 people, plus leftovers for lunch)

1 onion, diced
3 cloves garlic, finely chopped
1 chilli, chopped
cumin (powdered or seeds)
salt and pepper
500 g mince
capers, up to you how many
2 tbsp wholegrain mustard
2-3 tbsp sweet chilli sauce
dash balsamic vinegar
400g tin tomatoes
6 tortillas (c. 20cm ones)
cream cheese
cheese, grated
  1. Sauté onions and garlic.  When softening, add chilli, cumin (as much as to your taste, I use a good 3-4 tablespoons), salt and pepper.  Stir.
  2. Add mince and break up, stiring to brown all through. 
  3. Add capers, mustard, sweet chilli and balsamic.  Mix through the mince.  Add the tomatoes, stir thoroughly and reduce temprature to low and allow to simmer for anything from a half hour to an hour or so.  Stir occasionally, to ensure the flavours are all through. 
  4. When you're about 20 minutes away from being ready to eat, turn oven on to about 180 degrees celcius. 
  5. Make up the enchiladas by spreading cream cheese onto the tortillas.  Spoon in a decent amount of mince and roll up (like a canneloni, or a crèpe), tucking the two sides together.  Place, seam down, into your baking dish.  Tuck all six alongside each other, so they stay put.  Grate cheese over the top. 
  6. Bake for about 20 minutes, or until the cheese has melted and browned a little. 
  7. Serve with a salad and you're done! 
PS:  Thanks, Manu Chao, for the title-inspiration, and you can add extra tomato on top of the enchiladas too, if you want, under the grated cheese. 

11 October 2011

fish n chips, fish n chips, makes me wanna lick my lips

We eat fish fairly frequently.  One of the bonuses of having a boat, and enjoying sitting out with a line for a few hours.  If it's home-caught (so to speak) it's usually snapper.  If it's from the supy, it's whatever looks good that ain't going to completely fleece the wallet.   Usually we simply pan-fry the fillets - I mean, with tasty fresh fish, what else do you need to do?  However, sometimes you just feel like good ol' battered goodness.  Last night was such an evening. 

I'd heard the Morning Rumble talking about a new batter- and fritter-mix available on the market.  Fogdog, made in NZ, by a couple of blokey blokes, it was apparantly really good - light, crispy, the opposite of dodgy stodge (which is more often than not what you get from the local chipper, these days).  Obviously you can easily make your own beer batter from scratch (a little flour, cornflour and beer), but sometimes it's fun to try out new products.  Everyone's a sucker for advertising from time to time.  So yesterday, picked up some fresh trevally and a packet of this supposed wonder batter.  Given our general aversion to battering fresh fish, it had big proverbial shoes to fill.  

And it did!  It was light and crispy.  Apparantly, cooking with beer (as opposed to water-based batters) reduces the oil absorbtion.  So using beer is actually better for you.  Sweet!!  It cooked very fast (though, that could have been controlled better by yours truly, had I reduced the heat under the pan a little) and didn't fall/slide off the fish.  All you need is the packet and half a bottle of beer.  I used Carlsberg, but next time would be interesting to try it with a darker beer, like Speights Old Dark, or something... 
1 packed Fogdog batter
140 ml beer
2-3 fillets fish
2 large potatoes
cumin seeds
salt
rice bran oil
salad
  1. Cut potatoes into nice, fat, chunky chips.  Toss with a little oil and cumin seeds.  Whack into oven at about 180 degrees celcius.  I usually leave them cooking away for a good half hour or more, then grill them for a couple of minutes, to crisp them up.  Remember to toss them from time to time, so they don't stick to the tray. 
  2. Make up your salad, however you fancy it.  Now you're pretty much ready to go, once the chips are done to your liking. 
  3. When almost ready to serve, mix beer and batter in a bowl.  I reckon it's best to use a whisk, if you have one, as it gets more air into the batter, which presumably helps make it light.  Pat the fillets dry and pour about 4mm oil into non-stick pan.  Get the oil good and hot (drop a wee bit of batter in, to see if it sizzles - that's how you'll know). 
  4. Carefully place the pieces of fish into the hot oil - be careful not to drop them in, as you'll make a mess of your kitchen, and likely burn your fingers/arm.  I know, I did that last night.  Kitchen floor was a shambles.  Have tongs at the ready, 'cause the fish won't take long.  Pretty much as soon as you've put the fish in, it's time to turn it over.  When golden and crispy remove from pan and serve, with salad and cumin-crusted chips. 
Nb: You don't have to use rice bran oil, but if you don't, be very careful to keep an eye on the oil, so it doesn't burn.  Olive oil, the cuisine guru for so many things, isn't much good here.  It has a lower burning point, and the stronger flavour can mask the delicate flavour of the fish.  I'd recommend either rice bran or avocado, as they both have a high burn point. 

06 October 2011

You know you curry me life, you curry me thinking...

Thanks, Katchafire, awesome song.  I know the original didn't actually mention curry but, to be honest, you'll be hard-pressed to find one that does.  Sometimes a little poetic licence is needed, I'm sure those kings of dub won't mind. 

As you've no doubt noticed, it's spring.  Curry isn't really a food that jumps to mind when you think of sun, al fresco dining and the beach (I'm a year-round beacher, none of this 'summer-only' puha), but perhaps we need to adjust our thinking.  I can definitely understand why curries are moreso associated with winter, and maybe autumn - it's cold, they're hot; it's cold, they're warming; you want thick, comforting food with plenty of carbs, they're thick, comforting and come with rice and/or breads. 

However, it's spring and summer vege gardens are being put in around the country (well, around the warmer parts anyway - might be another month or so for the deep south).  Vege gardens = fresh herbs.  Coriander, thyme, chives, parsley.  Nothing makes me curry-hungry more than the smell of fresh coriander.  So it was that last night, after returning home from our bi-weekly shop, that we whipped up a thai yellow curry, spurred on by the coriander in the garden, and the smell of the one sitting on the kitchen sill. 

Break out of the seasonal chains peeps - curry it up year round.  And watch this space for a tasty looking greek stew a la Nigella (it uses a whole bottle of white wine, so surely we can't go wrong) - winter's food is spreading its wings! 

1 onion, diced
2 cloves garlic, diced
2cm ginger, diced
1 capsicum, sliced
handful mushrooms, chopped
few florets broccoli
dash sweet chilli sauce
1 tbsp (or so) curry paste
1 tin (or so) coconut milk
sesame oil
2 chicken thighs, chopped
handful nuts, seeds
  1. Brown chicken lightly in a little oil (olive, rice bran, whatever).  Remove from pan and set aside. 
  2. Fry onion, garlic and ginger in sesame oil, until slightly soft.  Stir in curry paste, chilli sauce and coconut cream/milk.  Let it reduce a little, over a medium-low heat. 
  3. Add in all other ingredients and leave to simmer until you're ready to eat - the nuts give it so much texture and a wonderful flavour.  We've been using a mixture of brasil nuts and almonds, crushed up a bit.  So good - wouldn't go back to a nutless curry. 
  4. Get rice on - I cook it as per the link above (click on 'rice').  I usually use a stock cube though, rather than salt, and always throw in some cumin seeds. 
  5. Serve when all's ready and enjoy!  This makes enough for 4 people, maybe 5 if you have roti or naan too. 
PS: The picture of the dogs isn't completely random, they were apparantly enjoying the wonderful aroma that is coriander too. 

30 September 2011

Copa cabana on a plate

Fish, chips and salad.  Doesn't sound very blog-worthy, does it?  Okay, how about if it's fresh snapper, cumin-crusted big fat homecut chips, and a stirfried salad with so much colour it's like carneval has shimmied onto your plate?  Yeah, thought so. 

We've had this salad for the past two nights, and to be honest I'll be voting for the trifecta, 'cause it's so yum.  I think it would be awesome using any oil, but sesame is definitely the best, if you've got it.  It has a strong flavour, but doesn't overpower the veges.  Obviously, as with all salads, feel free to change certain veges, if you don't have them but have others.  Keep the colour though, it's such a good looking plate when there's more than white and green.  We had it with the beetroot one night, and without the other - you couldn't really taste the beetroot, but it did make it even more colourful, and you get the knowledge that you're eating super-high-antioxident food.  Just add it at the end, on top.  Buon appetito! 

sesame oil, to cook
capsicum
mushroom
carrot
broccoli
red onion
garlic, finely chopped
ginger, finely chopped
brasil nuts and almonds, munched up a little
fresh sage
fresh thyme
beetroot (on top)

PS: The chips were cut up nice and chunky, then tossed with oil and cumin seeds, before chucking into the oven for a half hour or so. 

24 September 2011

It's kaimoana time again, friends

Sunny days, daylight savings on the way.  Time for BBQs and seafood.  With the ABs playing France tonight, we've got chips and sangers for the kids, but what about us, more discerning big kids?  Perusing the wares at the local supy this arvo we settled on prawns.  Skewered.  BBQed.  Mean. 

KB's a master of tasty seafood - full of flavour, but not overpowering the delicate nature of the fodder itself.  Tonight's was tasty as usual, but with the addition of a couple of different ingredients it took on an amazing silky texture, almost creamy, and flavoursome as hell. 

Mix the following (and anything else you have to hand and feel inclined to throw in), brush over skewered prawns, and go to BBQ town.

Lemon zest (plenty plenty plenty)
Mint
Wholegrain mustard
Salt and pepper
Capers, mushed up
dash of sugar

13 September 2011

the knave of hearts, he stole some tarts...

Every day I drive past at least two signs for berry farms.  At the moment the signs say 'closed' (oh, and 'COME ON ALL BLACKS!!'), but they're a reminder of goodness to come.  Fresh blueberries, raspberries and massive trays of sunny strawberries for only $6 (go the misshapen seconds trays!!).  Whilst I may still have a month or so to wait, it's never too early to break out the frozen berries for some muffins.  So, blueberry muffins it is, with a hint of white shocola.  Normally white chocolate has me sticking my tongue out in distaste (too sickly sweet), but with berries it seems to take on a whole new dimension, one of subtle, nutty, vanillayness.  Okay, perhaps it's a day for making up words.  Never mind, the muffins are so tasty, I'm sure the lexical authorities will forgive me.  

2 cups flour
1 tbsp baking powder
1/2 tsp cinnamon
5 tbsp raw sugar
1 cup white chocolate (chips, bits, whatever)
2 eggs, beaten
3/4 cup milk
75g butter, melted
1 cup berries
extra raw sugar, optional
  1. Preheat oven to 200 degrees celcius.  Grease muffins tins. 
  2. Sift dry ingredients into bowl.  Stir in chocolate and make a well in the centre. 
  3. Combine eggs, milk and butter.  Pour the mixture into well and add blueberries.
  4. Stir until just combined. 
  5. Pour mixture into muffin tins (about 3/4 full) and sprinkle with a little raw sugar. 
  6. Bake for 15-20 minutes until golden and inserted skewer comes out clean. 

11 September 2011

keep it simple, stupid

You know how sometimes you just hanker for something simple for dinner?  I don't mean a packet of 2 minute noodles, but just simple, fresh tastes.  Last weekend we had family staying and were lucky enough that they brought with them a rather large amount of eye fillet.  Needless to say it was on the menu a couple of times last week.  Perfect meal when you need something quick, easy, but still bursting with taste and nutrients.  We coupled it with a good ol' green salad.  Now, you may wonder why I'm blogging about how to make a salad, but never fear - I'm not going to break down how to make one (no one is THAT simple), but just to remind you of their existence.  We tend to forget the humble garden salad over winter, but damn, we shouldn't.  So put away your fancy foods and kitchen contraptions for a night and break out an old school iceberg.  Yum, fresh and leaves you with more time to watch the rugby and pour another wine. 
Nb: Meal is nicely finished off with a spot of custard.  Nom nom nom.   


06 September 2011

*teaser alert**teaser alert**teaser alert*

Right, this is just a little teaser, for Kush and Millie.  I have been terribly slack with the blog posts of late, but to be honest it's because I've just been terribly slack in the cooking arena.  Profs + work + musical theatre do not make for much spare time.  However, in an effort to remedy my slackness I got the camera out last night as we prepared a mini feast for our gastronomic senses.  So, watch this space...tastiness is a-comin'.  xx A


PS: The photo is from being at The Woodbox last weekend - OMG, the prawn and sweetcorn wontons were AMAZING.  Once I'm done with this play, those are next on my list.  Even have a wonton wrapper recipe bookmarked.  Nom nom nom.  

23 August 2011

thank god for the pine tree

Christmas trees (well, in NZ anyway).  Timber.  Paper.  Keeping the planet's CO2 levels down and O2 levels up.  Dodgy pine cone decorations.  Resin.  Food for some types of moth.  Pesto.  Pines are wicked. 

Pasta was on the menu last night.  Not a particularly unusual thing for a Monday night, by any means, but by no means unbloggable.  Once we'd established that we wanted pasta, we moved onto step 2 - creamy, tomato-based, or oil/herb-based...  I vetoed creamy and decided on tomato.  Step 3, that's the fun part.  Scooting around the pantry and the supermarket and creating the dish inside your trolley.  We had some bits and pieces in the house - a red onion, some cashews, tomatoes, but that wasn't going to be quite enough.  I figured I'd head to the supy and grab some bacon, 'cause that's always a winner.  Happy days to be at Countdown, 'cause they had red capsicums and pinenuts on special, which almost never happens (well, for the pinenuts). 

Allow me to digress for a little, and wax lyrical about the (not-so)-humble pinenut.  Pine nuts are pretty much what the name suggests - the edible seeds of pine trees.  There are about 20 species of pine which produce nuts big enough for eating (thanks Wikipedia), though all pines have edible seeds (though you might need tweezers for some).  The most well known type is the pinus pinea, the Stone Pine, cultivated throughout Europe and famous for its use in italian cuisine, such as pesto.  In NZ the pinenuts we get tend to be the pinus koraiensis, from Korea - they're slightly fatter than their elongated continental brothers.  Next time you're looking to get some pine nuts, see where they come from, 'cause pine nuts pines seem to thrive on pretty much all continents.  I like it.  I'm seriously tempted to head back to Masons, a garden centre here in TA, and grab me a pinus pinea - there was one there when we picked up an avocado tree a few weeks back.  How cool would that be, harvesting your own pine nuts? 

Okay, I'll stop with my piney rant now, but if you've ever eaten homemade pesto before, or had lightly toasted pine nuts on their own, then you'll know where I'm coming from.  If you haven't, break out man.  Just one word of warning - pine nuts, once they start browning (and it takes a while before they do), boom! they brown quick. 

400 g turkey mince (it was there, had to try it!)
1 egg
dried herbs/spices
salt and pepper
1/2 red onion, diced
3 cloves garlic, finely diced
1 red chilli, finely diced
oil
1 tin tomatoes
basil (fresh or dry)
c. 1 cup cashew nuts
c. 1/2 cup pine nuts
spaghetti
parmesan cheese, grated
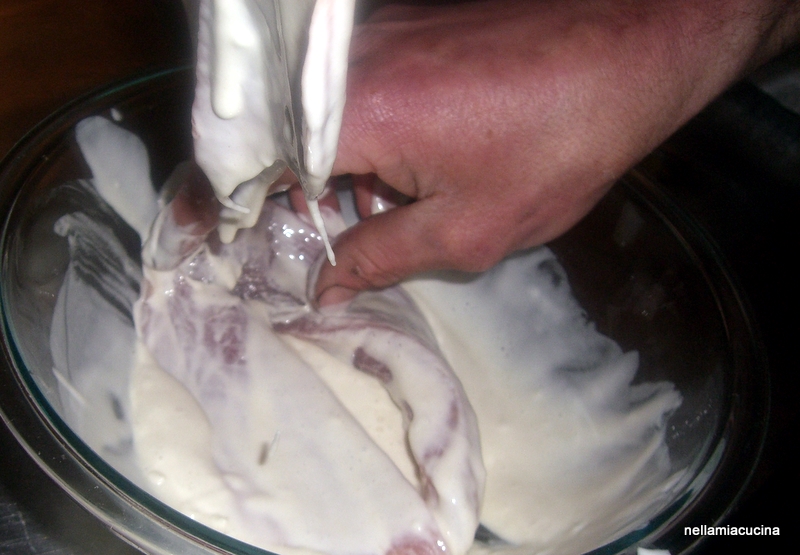
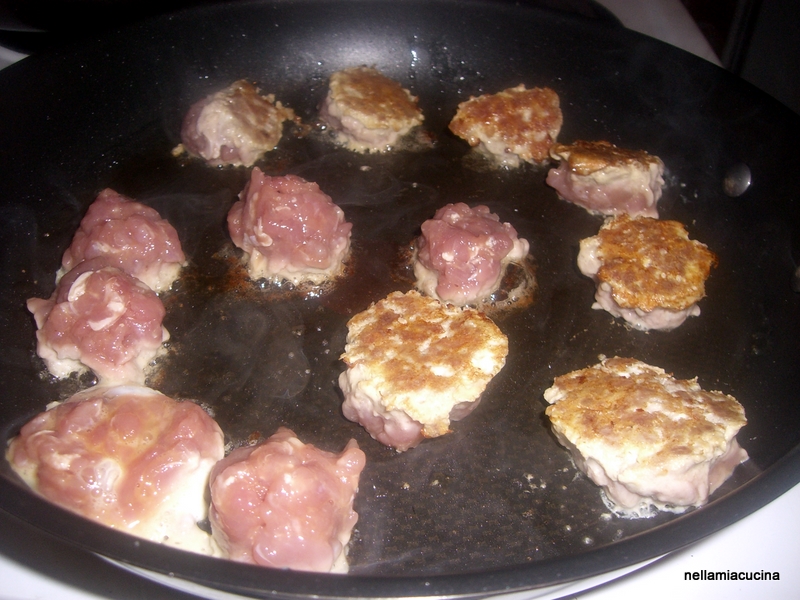
  1. Mix the turkey mince, egg, herbs/spices and salt/pepper and form into little balls.  It'll be very wet, but will hold their form.  Place into hot pan (oiled, if necessary) and brown on one side before carefully turning over.  Remove from pan and set aside.  They'll still be pink in the middle, that's fine. 
  2. In small pan toast pine nuts (no oil required) - they'll seem to do stuff all to begin with, but once their oil starts to come out they'll brown really fast, so be careful that they don't burn.  Set aside. 
  3. In meatball pan fry onion, garlic and chilli (don't worry about cleaning the pan) in a little oil.  Add tomatoes and nuts (we crushed half the cashews, so there weere different textures).  Simmer for a little while and cook spaghetti. 
  4. Add meatballs back to pan, carefully covering with sauce ('cause you don't want to break the balls up).  Leave them to simmer while the pasta cooks - this will allow the turkey to cook through. 
  5. Serve on spaghetti, with frehly grated parmesan on top.  Yum!! 
Nb: I forgot to add any salt, pepper, herbs or spices to the meatballs themselves, which meant we had a super tasty sauce, but the meatballs were pretty bland.  Next time I'll be adding some cumin seeds into them, along with the salt and pepper.  Whoops, dumb mistake. 
     

07 August 2011

if you like piña coladas...

Okay, this isn't actually anything to do with piña coladas, but piña colada sort of rhymed with peanut butter, so...  Hey, it's a Sunday night, so throw a girl a bone here.  Anyhoo... a couple of weeks ago we had friends and their families over for lunch, potluck.  There are two things which rule about potluck meals - you don't have to cook everything, and there is a variety of dishes to sample.  Oh, and a good portion of the dishes go home with those who brought them.  So three things.  Sweet.  This recipe is for a satay sauce.  Ooooh, I hear you (sarcastically) coo.  Seriously, before you roll your eyes and declare there's nothing special about satay, it's just a peanut sauce, try this one.  Get some chicken kebabs (that's what we had), or slap a layer onto a tasty homemade burger, then sink your teeth into a taste sensation.  Over the top?  No.  This sauce, from Mel Instone, is sublime.  It's got a nice twist, from the chilli and fish sauce.  I'm just trying to thing of more ways to slip it into our evening fare.  Maybe on pizza bases?  Or just on a spoon.  Yum.  So good.  Hungry.  Going to make some more.  Bye!! 

1 cup peanut butter
1 1/2 cups coconut cream/milk
1/2 cup sweet chilli sauce
2 tbsp fish sauce
2 tbsp lemon juice
1 onion, finely diced
4 cloves garlic, crushed
a little oil
  1. Fry onion and garlic in oil. 
  2. Add all other ingredients and simmer for 15 minutes. 
  3. Eat and enjoy!! 

02 August 2011

Stop! collaborate and listen

Rice, rice baby (din na na na na na na).  We're officially into the last month of winter.  It should be bitterly cold all the time, with the only culinary thoughts breaking through being those of casseroles and hearty stews .  Not colourful salads and BBQs.  However, global warming seems to be intent on throwing off the weather books and doing its own thing.  Which suits me fine 'cause I'm all for warmer climes and the foods that go with (not that I don't love a good, warming, rich stew too, especially with dumplings, or stuffing, or yorkshires...). 

We had a party on Saturday, a 180th birthday party (combining the festivities for granddad, mum and brother).  Held at Ngongotaha, on a gloriously sunny Saturday (in the middle of winter).  Sure, once the sun went down it was cool, but certainly not freezing (though brother and boyfriend may dispute this, seeing as they were the ones actually standing outside AT the BBQ).  Throwing off the shackles of winter cookery we had a BBQ (in case you hadn't picked up on that), complete with sauteed calamari and deliciously light and fresh rice noodle salad.  Stick that in your pipe and smoke it, winter! 

The noodle salad (made with rice vermicelli, or glass noodles) was amazing, a creation of my sister-in-law Ness.  Really tasty, easy to make, and incredibly colourful, which in winter is a nice change.  We get so much variety in summer, it was great to see some summery colour back on the plates.  KB and I liked it so much that we made it again on Sunday night, to go with our duck.  So, without further ado, rice is back with a brand new invention...

50 g rice vermicelli (about half a packet)
2 carrots, sliced real thin, into wee matchsticks
1 capsicum (colourful, so red, yellow or orange)
1 red onion
good handful of each mint and coriander
1/4 cup lime/lemon juice
1 - 2 tbsp fish sauce
2 tbsp sweet chilli sauce
salt and pepper
  1. Cook noodles by pouring boiling water over them and stiring around in a bowl for a minute or so.  Drain and set aside (I stirred through a little sesame oil, to help break them up a bit and stop it sticking in a clump). 
  2. Stir through veges and herbs. 
  3. Mix together the lime, fish and chilli sauces.  Stir through the salad. 
  4. Season with salt and pepper and serve.  Really good with fish, calamari or prawns too. 

30 July 2011

The boys went out fishing the other day.  Sweet, fresh fish in the middle of winter.  Kahawai!!  Whilst the lads were busy doing their hunter-gatherer best, Alex and I were busy in thge kitchen preparing some bits and pieces for lunch.  She had a recipe for a particularly tasty pumpkin soup, so into the pot the requirements went (with a few additions, of course).  The result was as good as promised, light hints of curry and fresh veges.  Not a lot more to say, really, other than get out your stock pot and get in the kitchen. 

1 kg pumpkin
1 onion, diced
2 cm ginger, diced
1 L chicken stock
1 tin tomatoes
1 tin coconut cream
2 tbsp curry paste
2 tbsp sweet chilli sauce
2 tsp cumin seeds
salt and pepper
  1. Peel and chop pumpkin, put into large pot (stock pot is perfect). 
  2. Add all other ingredients and simmer until the pumpkin is cooked.
  3. Puree or mash - we mashed it, because the whizz stick was broken, and I think I preferred this, as it still had a few chunks left in it.  YUM!! 
  4. Serve with toast, or cheesy buns. 

20 July 2011

Honey, I'm home!

The man of the house comes home and the little lady (in her pinnie) has dinner burbling away on the stove.  Picture perfect, right?  Well, maybe if you're watching a 1950s sitcom rerun.  However, stranger things have happened.  Last night this was the picture in our kitchen, only I wasn't wearing a pinnie, I was about to open a beer (for myself) and the dinner burbling away on the stove was pink.  Sort of alters the stereotype eh?  However, dinner's dinner and ours was tasty, pink or otherwise.  Not to mention men wear pink now, with pride, so pink food?  Meh, no problem.  It's food. 

We were having chicken breasts last night, stuffed with crème fraîche and harissa.  In the past we'd used cream cheese, but as we had the fraiche in the fridge, seemed a good idea.  And it was.  It may actually have been better then when cream cheese was used, though tough to tell without comparing contemporaneously.  Suffice to say that either will be equally tasty.  So, all that was needed was something to accompany.  Risotto.  Not a typical side dish maybe, but I felt like rice, and we had veges a plenty to go into it.  What follows is what went into the pink risotto last night, though feel free to change any of the fillings.  Obviously don't change the rice, stock etc, they're kinda key. 
1 tbsp butter
1 onion, diced
1 clove garlic, finely chopped
small knob ginger, finely chopped
1 and a half cups short rice (aborio)
small glass white wine
1 L vegetable stock
3 small beetroot, peeled
2 leftover sausages, sliced
good dollop basil pesto
salt and pepper
1/2 cup cheese (I used edam)
  1. On high heat fry onion, garlic and ginger in the butter, until softened.  Add the rice and stir to coat.
  2. Pour in the wine (feel free to use more than a small glass, I just didn't want to waste too much!), allow to evaporate.  Once the liquid is reduced pour in the prepared stock. 
  3. Reduce the heat to medium now, allowing to simmer away, but not letting the liquid disappear too quickly (the rice needs time to cook, though if you do end up with insufficient liquid and still-uncooked rice, just pour in a little water). 
  4. With your vegetable peeler, peel slivers of beetroot (outer skin removed) into the pan.  When you stir it the whole thing will turn a fantastic pink!  Stir through the sausages (or sliced chorizo), pesto, salt and pepper (or whatever else you wish) and cheese.  
  5. This can be put aside when cooked, to be warmed through again later, if you want to get it all ready, so you can relax before dinner. 
  6.  

18 July 2011

News of the World - chocolate update

This isn't actually a new recipe - it's an update (and I think an improvement) on the cake from last year's 'Procrastibaking'.  I was asked on Thursday night if I would be able to make a chocolate cake on Friday morning, for a 40th birthday - nothing fancy, just good ol' chocolate cake with chocolate icing.  Sweet.  We had chocolate sauce in the fridge (a la ice cream), so into the cake batter it went.  And the icing.  I wasn't sure whether or not it would make a noticeable difference, but it did.  I tasted one of the crumbs which stuck to the tin and chocolate sauce heaven.  So there you go - squirt a decent amount of salsa chocolata into your next festive masterpiece.  Extra extra...

12 July 2011

maimai wonderland


Winter means different things to different people.  To some it means grey hibernation for a few months; for others it signals a season of skiing, apres-ski aperitifs and powdery goodness; to a number it means shooting.  Duck shooting, to be specific.  Now, I'm not a duck shooter - no one in their right mind would let me loose with a gun (not that I'm unwilling to learn how to use one, one day), but I am a friend of food.  So whilst to most of the lads duck shooting equals whisky, cold mornings and talking sh*t with the boys, to me it screams DUCK FOR DINNER!

A friend of ours, James, does duck shooting, hence the duck in the freezer.  Neither of us had ever cooked with duck before (to be honest, I've probably only eaten it once or twice, and usually in a red curry), but knew that it was a red meat, more like cooking a fillet of steak than a chicken breast.  KB marinated the pieces in red wine, soy and honey, with ginger, garlic and possibly some sesame oil.  Oh, and wholegrain mustard, that was key.  Really wicked tang.  Once he was ready to cook it the breasts were seared quickly in the pan, then transferred to an oven dish, to bake (not for too long though, you want it tender, not dried out). 

The duck was served on a bed of mashed kumara and carrot, alongside caramalised onions and stir-fried red cabbage.  On top was a dollop of beetroot and horseradish relish.  Combine in a bowl 2 tbsp horseradish, 2 tbsp balsamic, a glug of olive oil and 4 beetroot, grated.  Nom nom nom.  Give these a whirl - and if duck ain't in your purview, or you just don't fancy it, grab some beef, lamb or rabbit. 

PS: Entree was crayfish, hence the photo below... 

16 June 2011

gary the banana

It must be a week for people to realise that they have bananas over-ripening in their fruitbowls.  I did a couple of nights ago and so decided to make some muffins to deal with that.  And Laura, of Hungry and Frozen fame must have too, given her latest offering (that combined with lack of sleep and a very active culinary imagination). 

I'm not a big muffin-maker, if I'm honest, 'cause they just don't generally do a lot for me.  But banana muffins (and blueberry) can be different.  The key to wickedly good muffins, in my humble opinion, is increasing the amount of fruit, compared to the recommended amount.  I mean, a recommendation is like a yellow light right?  A suggestion, yes?  The bulk of this recipe is from the Chelsea Sugar site, but with a few important variations - the banana quotient was increased, as were the chocolate chips.  A light dusting of sugar and mixed spice will lift any baking, and for some reason (maybe the extra banana, or the size of my muffin tins) I ended up with 18 muffins, rather than the 12 which I was expecting.  Score! 

Apologies for the lack of photographic evidence of these muffins - all 18 are gone.  They went like hotcakes, so to speak.  But surely that's evidential proof of their tastiness?  And I'm sure you can imagine what a banana-choc-chip muffin looks like.  Anyhoo, in the absence of a photographic hommage, I have Gary the Banana, a Paul Rangiwahia original.  Kia kaha in the kitchen guys! 

2 eggs
3 ripe bananas, mashed
1/4 cup oil (I used rice bran)
1 cup milk
3/4 cup brown sugar
2 1/2 cups flour
4 tsp baking powder
c. 1 cup chocolate chips
white sugar and mixed spice, for dusting (optional)
  1. Preheat oven to 180 degrees celcius and grease/spray muffin tins. 
  2. In large bowl mix the eggs, bananas, oil, milk and brown sugar together.
  3. Mix in flour, baking powder and chocolate chips.  Don't over-stir it, just combine. 
  4. Spoon into tins and bake for about 15 minutes, or until golden and a skewer comes out clean (in saying this, mine were still a little gooey in the middle, but that's just because of the amount of banana in there). 
  5. Remove from oven, let rest in tins for a couple of minutes, then turn onto cooling racks.  They're really good warm, so make sure you eat one straight away! 

14 June 2011

stuff you

Until last night I'd never made stuffing.  Roasted chicken, sure.  But stuffing?  No.  Stuffless chook.  Which is nuts, 'cause stuffing is the yorkshire pudding of roasted poultry.  And casseroles...  That's right, a totally different use for the tasty, doughy goodness.  We had a chicken casserole, which was topped with a layer of stuffing, then slices of cooked potato and finally grated cheese.  A winning combination.  And it was easy (as I'm sure many of you have realised years ago).  So stuff you, get in the kitchen! 

6 slices frozen bread
1 onion, finely diced
1 egg
1 tbsp flour
2 tbsp dried mixed herbs
salt and pepper
  1. Chop the bread into little pieces, to make into breadcrumbs (a food processor will make this job easier, but then you do have an extra dish to clean.  Up to you). 
  2. Mix in the onion.  With your hands work through all the other ingredients. 
  3. Add a little water, to make the mixture into a doughy texture. 
  4. Shove on top of a casserole (sausage, chicken, stew), or into a to-be-roasted chook. 

13 June 2011

raving about ravioli!

I think ravioli is something most people really enjoy - pasta is a crowd-pleaser anyway, and add to the equation tasty fillings and you're on to a winner.  A couple of weekends ago KB and I had a wicked meal with family at Rain Bar at Papamoa Beach.  We both had terakihi on ravioli, with dill butter drizzled over the top.  It was fanbloodytastic.  One of those meals where you are completely silent for the whole meal, 'cause you've been so sucked in by the flavour that you haven't the brain capacity left to engage in conversation.  One of those meals. 
Anyhoo, it got us to thinking - why haven't we been making ravioli at home?  We have a garden full of herbs, we both love trying new combinations of flavours - surely these little parcels of taste would be the perfect foodject?  Yep, they were.  
Saturday evening we hit the kitchen, armed with flour, eggs, filling potentials and red wine (for us, not the ravs).  I got onto the pasta, while KB prepared two very moreish fillings.  I'll start with the fillings, 'cause you really want them to be sorted and ready to go either before you start the pasta, or be doing them at the same time, 'cause once the pasta's ready to go, you don't want it to dry out, you want to get the filling in and press the edges down while it's still malleable. 
Filling #1...
  1. Finely (really fine) chop an onion, a knob of ginger, a cup of mushrooms - saute in some butter.  Throw in some fresh coriander and mint (shredded) and combine.
  2. Transfer to a bowl and stir through sour cream - enough to get a consistency which will be stay together, but not be too runny.  Don't forget to add a couple of good grinds of salt and pepper too. 
Filling #2...
  1. Finely chop pak choi (or bok choi) leaves.  Combine in a bowl with some capers and sweet thai chilli sauce (to get the mixture to stick together a bit).  Chop pieces of blue cheese - about 1 cm, they need to fit in the ravioli.  Salt and pepper. 
Pasta etc...
  1. Put 2 cups flour onto a clean, dry surface (I use a large marble chopping board, 'cause it doesn't stick, but benchtop will be fine too, and probably easier for rolling - just make sure you've extra flour, in case you need to add a little more to the surface later on).  Make a deep well in the centre. 
  2. Separate two eggs.  Keep the yolks, do what you like with the whites (maybe save them to add into an omelette the next day?).  Get another two eggs and beat them lightly with the two yolks (so, all in all, you have 2 eggs + 2 extra yolks). 
  3. Pour the eggs into the well of the flour.  Pour slowly, you may have to pull some flour in to prevent the egg running everywhere, and then start pouring again.  Once all the egg is on the flour, pull the flour in from the sides, combining and kneading to form a nice smooth, elasticcy lump. 
  4. Roll the pasta out as thin as you possibly can.  We got ours pretty thin, cut the circles out for the raviolis, then re-rolled and re-cut, to get them paper thin.  That's what you want, paper thin.  It takes time, and some serious arm power - I'd recommend doing this as a duo, so you've got some arm power-backup. 
  5. Cut the sheets with circular cutters (we used a cookie cutter, about 10 cm diameter).  Reserve the scraps, to roll out again. 
  6. Place teaspoons of filling in centre of half the circles and brush the edges with water.  Top with another circle and press the edges down with a fork, to prevent escapee-filling.  Place on a flour-dusted plate and set aside (make sure you dust the tops of the raviolis with flour, if you're going to double-layer them on the plate, 'cause otherwise they'll stick). 
  7. Repeat process until you have used all your scraps and filling - we got about 20 raviolis, and they were pretty large ones. 
  8. Boil a pot of water - not boiling too fast though, the agitation of the water might cause your ravs to break open.  I set it over a medium hob.  Put the pasta in the water and cook for about 3 minutes.  Take a bite of an edge, to check they're cooked enough for you. 
Nb:  If you're going to use meat in the filling, it is important to cook it first, 'cause the ravioli cook so quick that they're not in the water long enough to cook the fillings too. 

09 June 2011

tiramisu!

When I was in Italy (Albisola Superiore) a few years back I went with a friend to her grandparents' house for a family dinner. After a few hours of chatting, in what I'm sure was absolutely flawless Italian (ha, yeah right!), everyone had settled in for the evening. Suddenly there's my friend's 6-year old niece jumping up and down in front of me, chanting something. It took me a while to figure out what that was, as children's voices are pretty high-pitched and therefore often difficult to decipher when heard at speed. I figured it out and (proudly) informed her mother that the little girl wanted some dessert. She was chanting 'tiramisu! tiramisu!'. Fair conclusion eh? Now imagine a living room full of Italians laughing heartily as only they seem to know how. Turns out 'tiramisu' means 'pick me up', which is what the little girl wanted. She wanted to see my (erstwhile) nose piercing. Of course. 
In NZ however you're pretty safe with assuming demands of 'tiramisu, tiramisu!' relate to hunger and a desire for dessert. Until last weekend I'd not whipped out one of these delectably indulgent treats for several years, which I now know was a foolish waste of good eating time. It is the most satisfyingly creamy, rich, but not sickly delight I think you'll come across this side of whatever the other side is. Yum yum, seriously it's so good. The marscapone can be pretty pricey, but it makes enough to feed about 6-8 people. And who knows - there might even be some left over to eat for breakfast?
From personal experience - make sure your coffee is good and strong, stronger than you'd likely drink it. If you have a coffee maker, great - short short black. The amount of sponge cake used was about 20 cm squared, standard size you might buy at the supermarket - it's best if it's a little stale, maybe a couple of days old, so it doesn't go soggy. Any container can be used, but if you have one half the size of your sponge, but twice as high, perfect (I had some sponge and cream left over, so used a couple of little ramekins as well).

250 g marscapone cheese
2-3 eggs, separated
50 g sugar
sponge cake
30 ml strong coffee
cocoa, to dust
  1. Beat the egg yolks and sugar in large bowl until pale. Beat in the cheese until creamy and smooth.
  2. In separate bowl beat egg whites until fluffy and peaks can form.
  3. Gently fold whites into marscapone mixture. This is now marscapone cream.
  4. Cover the base of your dish with sponge. Drizzle with coffee (not too much, as you want moistened, but not saturated). Cover with marscapone cream. Repeat.
  5. Dust with cocoa and chill in fridge for at least an hour.
  6. Serve by itself, or with some fresh berries alongside.

Nb: If you want the taste of berries (which go really well), but it's winter, grab some frozen or tinned ones and add a layer of berries between the sponge and cream. Make sure they're well drained, or omit the coffee and use a little berry juice instead.